
The certificate signing request![]() A CSR or certificate signing request is a block of encoded text that is submitted to a CA when enrolling for a certificate. When you generate a CSR within Keyfactor Command, the matching private key for it is stored in Keyfactor Command in encrypted format and will be married with the certificate once returned from the CA. (CSR
A CSR or certificate signing request is a block of encoded text that is submitted to a CA when enrolling for a certificate. When you generate a CSR within Keyfactor Command, the matching private key for it is stored in Keyfactor Command in encrypted format and will be married with the certificate once returned from the CA. (CSR![]() A CSR or certificate signing request is a block of encoded text that is submitted to a CA when enrolling for a certificate. When you generate a CSR within Keyfactor Command, the matching private key for it is stored in Keyfactor Command in encrypted format and will be married with the certificate once returned from the CA.) enrollment
A CSR or certificate signing request is a block of encoded text that is submitted to a CA when enrolling for a certificate. When you generate a CSR within Keyfactor Command, the matching private key for it is stored in Keyfactor Command in encrypted format and will be married with the certificate once returned from the CA.) enrollment![]() Certificate enrollment refers to the process by which a user requests a digital certificate. The user must submit the request to a certificate authority (CA). page provides the ability to submit a CSR and download the resulting certificate.
Certificate enrollment refers to the process by which a user requests a digital certificate. The user must submit the request to a certificate authority (CA). page provides the ability to submit a CSR and download the resulting certificate.
- Certificate Authorities: Configure at least one certificate authority
 A certificate authority (CA) is an entity that issues digital certificates. Within Keyfactor Command, a CA may be a Microsoft CA or a Keyfactor gateway to a cloud-based or remote CA. for enrollment by enabling the Use for Enrollment option under Enrollment on the Advanced tab of the certificate authority record (see HTTPS CAs - Advanced Tab or DCOM CAs - Advanced Tab).
 - Templates: Import at least one certificate template A certificate template defines the policies and rules that a CA uses when a request for a certificate is received. that can be used for the enrollment request against the configured certificate authority and configure optional certificate handling settings (see Certificate Template Operations).
- Enrollment Patterns: Add at least one enrollment pattern for the template and enable the
To request a certificate via CSR:
- Generate a CSR. This can be done within the target application (e.g. Microsoft IIS), by using a tool such as certutil or OpenSSL, or by using the Keyfactor Command CSR generation tool (see CSR Generation). Have the CSR file ready.
- In the Management Portal, browse to Enrollment > CSR Enrollment.
-
From the Certificate Request Information section select an enrollment pattern from the Enrollment Pattern dropdown.
A certificate authority (CA) is an entity that issues digital certificates. Within Keyfactor Command, a CA may be a Microsoft CA or a Keyfactor gateway to a cloud-based or remote CA., enable the Use Standalone CA option instead of selecting an enrollment template.The templates are organized by configuration tenant
A grouping of CAs. The Microsoft concept of forests is not used in EJBCA so to accommodate the new EJBCA functionality, and to avoid confusion, the term forest needed to be renamed. The new name is configuration tenant. For EJBCA, there would be one configuration tenant per EJBCA server install. For Microsoft, there would be one per forest. Note that configuration tenants cannot be mixed, so Microsoft and EJBCA cannot exist on the same configuration tenant. (formerly known as forest An Active Directory forest (AD forest) is the top most logical container in an Active Directory configuration that contains domains, and objects such as users and computers.). If you have multiple configuration tenants and enrollment patterns with similar names, be sure to select the enrollment pattern in the correct configuration tenant.
Tip: If you paste the contents of your generated certificate file before selecting an enrollment pattern, the CSR Content and the CSR Name tabs will be erased. You will need to re-paste the certificate data once you have selected an enrollment pattern.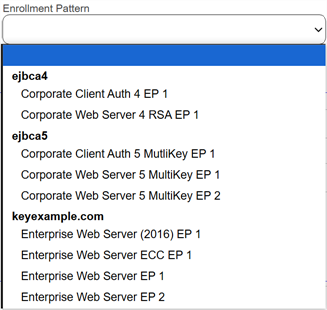
Figure 98: Select an Enrollment Pattern
-
Select the Certificate Authority from which the certificate should be requested, or select Auto-Select.
Note: The list of CAs that appears in the dropdown depends on the enrollment pattern's Restrict CAs setting (see Basic Information Tab) and the configuration tenant of the template associated with the enrollment pattern:Restrict CAs Enabled: The CAs listed in the enrollment pattern’s Certificate Authorities list, limited to those in the same configuration tenant as the associated template.
Restrict CAs Disabled: All enterprise CAs defined in Keyfactor Command that share the same configuration tenant as the associated template.
In either case, in order for the CA to appear in the dropdown:
The CA must have the Use for Enrollment option enabled in Keyfactor Command.
The template associated with the enrollment pattern must be available for enrollment on the CA.
The template must have certificate request permissions granted to the appropriate user (see HTTPS CAs - Advanced Tab or DCOM CAs - Advanced Tab).
If Auto-Select is chosen, a certificate authority (CA) will be randomly selected from the CAs available for enrollment with the specified enrollment pattern, which depends on the configuration of the RestrictCAs setting as noted above. This field is optional
Standalone CAs do not use templates or enrollment patterns and will be shown if certificate request permissions on the CA have been granted to the appropriate user (see HTTPS CAs - Advanced Tab or DCOM CAs - Advanced Tab).
Tip: The standalone option for CAs only appears if you have a standalone CA configured for enrollment. -
Paste your CSR into the CSR Content text area, with or without the BEGIN REQUEST/END REQUEST delimiters.
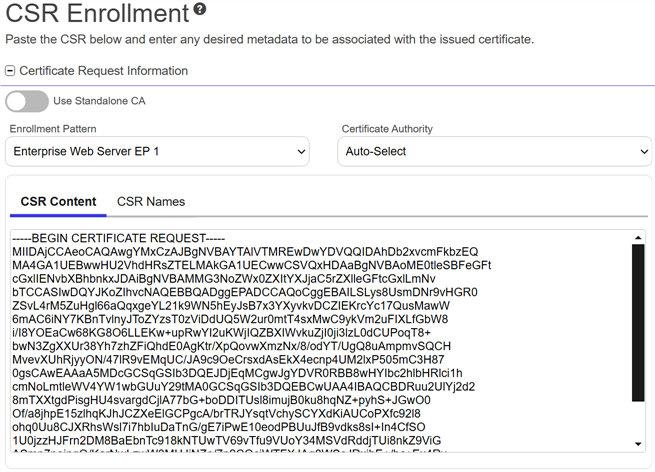
Figure 99: CSR Enrollment: CSR Content
-
The CSR contents will be parsed, and you will automatically be switched to the CSR Names view. Review the data to be sure it is as expected.
Note: If you are enrolling against an EJBCA CA, by default the total SAN The subject alternative name (SAN) is an extension to the X.509 specification that allows you to specify additional values when enrolling for a digital certificate. A variety of SAN formats are supported, with DNS name being the most common. length cannot exceed 2000 characters. If you need to enter SANs that will cause the total length to exceed this maximum,Microsoft CAs by default support a total SAN size of 4k. If you need to enter SANs that will cause the total size to exceed this, please refer to this article:

Figure 100: CSR Enrollment: CSR Names
Note: If a regular expression A regular expression--RegEx--is a pattern used to validate data by ensuring it meets specific criteria. Several fields on the CSR enrollment, CSR generation, and PFX enrollment pages support RegEx validation, including certificate subject and metadata fields. is defined system-wide or at the enrollment pattern level (see Enrollment RegExes Tab) for a subject part or SAN, and that field is left blank, the regular expression will still be applied to an empty string. For example, if a regular expression is defined for the organization field but no organization is provided, the system treats the empty string as the input and applies the regular expression accordingly. -
If enrollment fields have been defined for the selected enrollment pattern (see Enrollment Fields Tab), the fields will display in the Additional Enrollment Fields section. Additional enrollment fields have a data type of either string or multiple choice. String fields will appear as a text box; multiple choice fields will appear as a dropdown. All additional enrollment fields are required.

Figure 101: Populate Enrollment Fields
-
In the Certificate Metadata section of the page, populate any defined certificate metadata
Metadata provides information about a piece of data. It is used to summarize basic information about data, which can make working with the data easier. In Keyfactor Command, the certificate metadata feature allows you to create custom metadata fields that allow you to tag certificates with tracking information about certificates. fields (see Certificate Metadata, Configuring Template Options, and Adding or Modifying an Enrollment Pattern) as appropriate. These fields may be required or optional depending on your metadata configuration. Required fields will be marked with *Required next to the field label. Any completed values will be associated with the certificate once it has been synchronized with Keyfactor Command.
The order in which the metadata fields appear can be changed (see Sorting Metadata Fields). Tip: If a hint has been provided for a specific metadata field, it will display in parentheses to the right of the metadata label.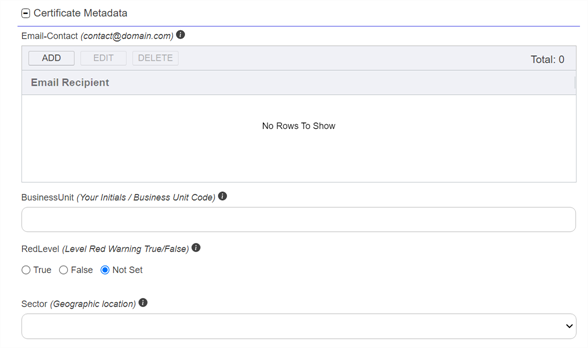
Figure 102: Populate Metadata Fields
-
The Subject Alternative Names (SANs) section of the page appears if you enable the Allow CSR SAN Entry application setting (see Application Settings: Enrollment Tab). This option is disabled by default. Click Add to add SANs if needed. In the Add SANs dialog, select a Type in the dropdown and in the Value box add one or more SANs of the selected type and save. Only SANs of a single type may be added in a single add action. Click Edit to change a SAN field. The Edit SAN dialog includes only one SAN, not the multi-SAN block. Click Delete to delete a SAN.
The SAN field in this interface supports: DNS name, IP version 4 address, IP version 6 address, User Prinicpal Name, Email. Alternate SANs may be submitted in requests using the Keyfactor API
An API is a set of functions to allow creation of applications. Keyfactor offers the Keyfactor API, which allows third-party software to integrate with the advanced certificate enrollment and management features of Keyfactor Command..Note: If you are enrolling against an EJBCA CA, by default the total SAN length cannot exceed 2000 characters. If you need to enter SANs that will cause the total length to exceed this maximum, see Appendix - Configuring Support for Large or Custom SANs with EJBCA.Microsoft CAs by default support a total SAN size of 4k. If you need to enter SANs that will cause the total size to exceed this, please refer to this article:
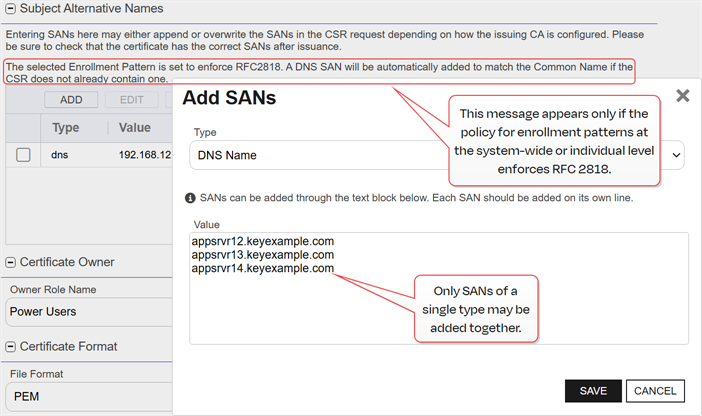
Figure 103: CSR Enrollment SAN options
Important: If the Enforce RFC 2818 Compliance option has been enabled for the selected enrollment pattern (see Enrollment Pattern Operations) or system-wide, a SAN will automatically be added with a DNS The Domain Name System is a service that translates names into IP addresses. SAN matching the CN A common name (CN) is the component of a distinguished name (DN) that represents the primary name of the object. The value varies depending on the type of object. For a user object, this would be the user's name (e.g. CN=John Smith). For SSL certificates, the CN is typically the fully qualified domain name (FQDN) of the host where the SSL certificate will reside (e.g. servername.keyexample.com or www.keyexample.com). entered for the certificate if one is not included in the CSR. This SAN will not appear in the grid and cannot be edited.Note: SANs submitted outside the CSR may be ignored, appended to SANs in the CSR, or overwrite the SANs in the CSR request depending on the type and configuration of the issuing CA. Please be sure to check that the certificate has the correct SANs after issuance. Any SAN added automatically as a result of the RFC 2818 compliance settings will still be added alongside anything you add here. -
The Certificate Owner section of the page appears if you set the Certificate Owner Role policy to Optional or Required at either the system-wide or enrollment policy level (see Configuring System-Wide Settings and Policies Tab). In the Owner Role Name field, select an owner for the certificate, if appropriate. The certificate owner is a security role defined in Keyfactor Command (see Security Roles and Claims). If the user assigning the owner is an administrator, the Owner Role Name will be a search select field in which to enter the new certificate owner. To narrow the list of results in the search select field, begin typing a search string in the search field. If the user assigning the owner is a limited access user, the Owner Role Name will be a dropdown. Only security roles of which the user is a member will appear in the dropdown.

Figure 104: Select a Certificate Owner
-
In the Certificate Format section of the page, select the desired encoding File Format (PEM
A PEM format certificate file is a base64-encoded certificate. Since it's presented in ASCII, you can open it in any text editor. PEM certificates always begin and end with entries like ---- BEGIN CERTIFICATE---- and ----END CERTIFICATE----. PEM certificates can contain a single certificate or a full certifiate chain and may contain a private key. In general, extensions of .cer and .crt are certificate files with no private key, .key is a separate private key file, and .pem is both a certificate and private key. or DER A DER format certificate file is a DER-encoded binary certificate. It contains a single certificate and does not support storage of private keys. It sometimes has an extension of .der but is often seen with .cer or .crt.). -
The Include Subject Header toggle is displayed in the Additional Options section of the page only when PEM is selected as the File Format. The default value is On. When set to Off, the first line in the PEM file—containing the certificate’s subject information—is removed. When set to On the first line in the PEM file—that containing the certificate’s subject information—is included.
-
Click the Enroll button to begin the certificate request process.
Note: If you attempt to complete a CSR enrollment using a CSR generated within Keyfactor Command, you will receive a Confirm Operation message requiring you to click OK to confirm and enroll unless the Enable warning for CSR generated in Command application setting has been disabled (see Application Settings: Enrollment Tab).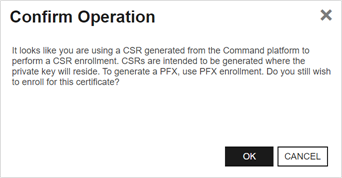
Figure 105: Enroll: Confirm Operation
- If the request completes successfully, you'll see a success and delivery message. Proceed to download the certificate in your browser.
-
If the template you selected requires approval at the Keyfactor Command workflow
A workflow is a series of steps necessary to complete a process. In Keyfactor Command, it refers to the workflow builder, which allows you to automate event-driven tasks such as when a certificate is requested, revoked or found in a certificate store. level, you'll see a message that your request is suspended and is awaiting one or more approvals. The user(s) responsible for approving the request will be notified (if the workflow has been configured this way, see Adding, Copying or Modifying a Workflow Definition). You can use the My Workflows Created by Me tab (see Workflows Created by Me Operations) to check on the status of your request. If the Management Portal feature has been configured to send notification alerts when a certificate is issued following approval, you may receive an email message when your certificate is available for download. The email message may contain a download link. See Issued Certificate Request Alerts.
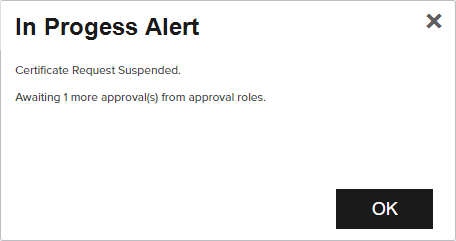
Figure 106: CSR Enrollment Completed Successfully—Awaiting Workflow Approval(s)
-
If the template you selected requires manager approval at the CA level, you’ll see a message that your request is pending. The user responsible for approving issuance of pending certificates will be notified (if that Management Portal feature is configured, see Pending Certificate Request Alerts). You can use the Certificate Requests page (see Certificate Requests) to check on the status of your pending request and complete the certificate download. If the Management Portal feature has been configured to send notification alerts when a pending certificate request is approved or denied, you may receive an email message when your certificate is available for download. The email message may contain a download link. See Issued Certificate Request Alerts and Denied Certificate Request Alerts.

Figure 107: CSR Enrollment Completed Successfully—Pending Status
Tip: The filename generated for the file for download is based on the CN of the certificate and will either include or not include the periods from the CN based on the configuration of the Allow Periods in Certificate Filenames application setting (see Application Settings: Enrollment Tab).
 ) next to the
 You can also find the help icon ( ) at the top of the page next to the Log Out button. From here you can choose to open either the Keyfactor Software & Documentation Portal at the home page or the Keyfactor API Endpoint Utility.
Keyfactor provides two sets of documentation: the On-Premises Documentation Suite and the Managed Services Documentation Suite. Which documentation set is accessed is determined by the Application Settings: On-Prem Documentation setting (see Application Settings: Console Tab).